
Contents
Components
Making the UniBeast USB Thumb Drive
Components
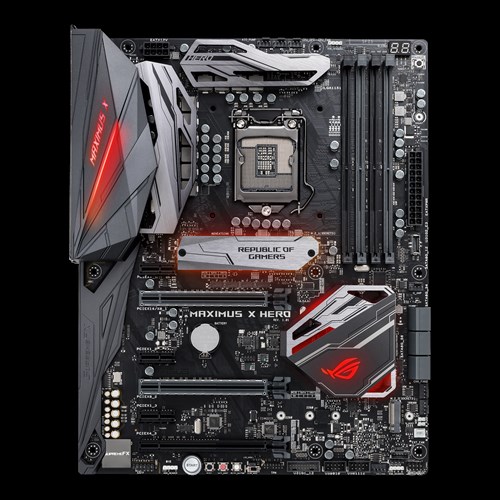
ASUS ROG MAXIMUS Z370 HERO X Motherboard
Crucial Ballistix Sport LT 32GB Kit (2x2x8GB) 2400 DDR4 (BLS2K8G4D240FSB)
Intel i7-8700K Coffee Lake Processor
Corsair H55 Liquid Processor Cooler
Samsung 960 Pro 512GB M.2 NVMe SSD
Sapphire RX 580 Pulse 8GB Graphics Card
Gigabyte Titan Ridge v2 Thundbolt 3 PCIe Card - Flashed for Mac Pro/Hackintosh
https://www.gigabyte.com/us/Motherboard/GC-TITAN-RIDGE-rev-20 < Not flashed/Just for FYI
https://www.newegg.com/p/17Z-0037-00010 > $200 (3rd party)
Corsair RM750X 750 Watt, fully modular Power Supply
Already Owned
Fenvi FV-T919 WiFi/Bluetooth 4 PCIe Card - Handoff and Continuity
Note: if the Fenvi FV-T919 is out of stock at Amazon, the Amazon link might show another Fenvi card. So, make sure you are ordering the FV-T919 model. I recommend you use Newegg to find the Fenvi FV-T919.
SYBA Low Profile PCI-Express 1394B/A Firewire Card Model SD-PEX30009
Lian Li PC-A05FNB Computer Case - No longer available
Comments
The Build
The core component of a build is the motherboard followed by the processor, memory and graphics card. My previous build, MyHero (I name my builds), is a ASUS ROG MAXIMUS VIII HERO which was so Success ful as a Hackintosh system that I decided to build another ASUS HERO motherboard. I skipped the Kaby Lake (200 series) processor based system because the Kaby Lake reviews stated that it wasn't much faster than the Skylake processor systems (100 series). So, while MyHero is still going strong, I decided to build a Coffee Lake HERO to replace my ZORRO build (which was still running strong!). Welcome to MyHero II and The HERO Club!
The Motherboard
This is my third ASUS motherboard, and, as I said in my Gene & MyHero build descriptions, I had heard good things about them from Tonymacx86, MacMan, beelzebozo and Gordo74, especially the ASUS MAXIMUS series. And, they were right! So, it wasn’t hard for me to decide on the motherboard for my Coffee Lake build - the ASUS ROG MAXIMUS X HERO.
The HERO series of the ASUS motherboards is one of the top of the line, and you get what you pay for! If you desire to overclock, then the ASUS BIOS gets you started with one click overclocking choices. I'll let you download the User's Manual and read the easy to follow tutorial. In addition to the usual number of PCIe slots for a ATX size motherboard, the HERO has two M.2 slots for either a AHCI (assigned to two SATA ports - SATA0 and SATA1) or NVMe SSD blade. The Number 1 M.2 slot in located under a special heat sink between the processor socket and the first PCIe 16x slot; the second M.2 slot is located after the two PCI x 16 slots to the right side of the motherboard.
 In MyHero, I used the Samsung 951 M.2 AHCI 512GB SSD so I didn't have to use RehabMan's NVMe spoof kext and SSDT. (See my Gene build for more information on the use of that kext and RehabMan’s patcher which works in El Captan and Sierra where NVMe drives are not supported natively in macOS.) Since MyHero II build will be using High Sierra which natively supports NVMe drives, I’m using the Samsung 960 M.2 NVMe 512GB SSD.
A unique feature of the HERO is the ability to run the system without putting it in a case. The big red button (bottom of the motherboard picture) is the on/off button switch with the Reset button next to it. This feature came in handy when I was bench testing the system before installing the components into the Lian Li case.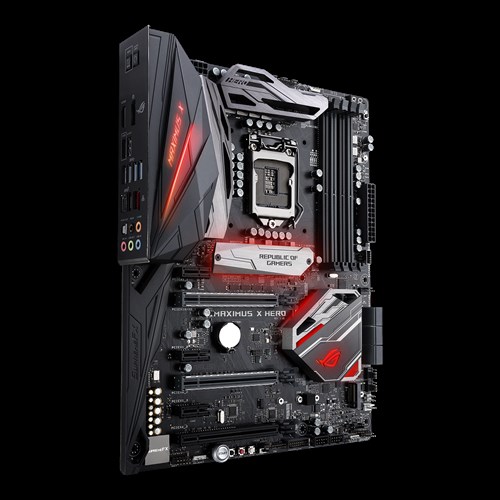 | The HERO X has two USB 2.0 ports on the Back Panel (gray color) located between the on-board video stack and the four USB 3.1 (Gen 1) stack. The HERO X also has a USB 3.1 (Gen 2, red color) and a USB 3.1 (Gen 2) Type-C ports, using the ASMedia controller which is supported in macOS. The USB 3.1 (Gen 1) Type-A ports use the Intel chipset (blue color). |
Another feature is the ability to update the BIOS from within the BIOS using the Internet to grab the updated BIOS and install it. Nice. However, the feature I used to update the BIOS is called the USB BIOS Flashback (page 2-12 of the HERO X User's Guide) which allows updating "the BIOS without entering the existing BIOS or operating system." Here's the simple instructions from the User's Guide:
To use USB BIOS Flashback:
1. Insert a USB storage device to the USB Flashback port. We recommend you to use a USB 2.0 storage device to save the latest BIOS version for better compatibility and stability.
2. Visit https://www.asus.com/support/ and download the latest BIOS version for this motherboard.
3. Rename the le as M10H.CAP, then copy it to your USB storage device.
4. Shut down your computer.
5. Press the BIOS Flashback button for three seconds until the Flashback LED blinks three times, indicating that the BIOS Flashback function is enabled.
6. Wait until the light goes out, indicating that the BIOS updating process is completed.
The rest of the components
I, again, chose the Corsair H55 liquid processor cooler which I used on MyHero, and it's size is perfect for the mid tower Lian Li case. The H55 was easy to install, and works great! At less than $60 USD, I can now recommend it, too.
Memory was easy to choose...right from the the Tonymacx86 Buy's Guide (shameless plug). I chose the Crucial Ballistix Sport LT 32GB Kit (2x2x8GB) 2400 speed which I find is good enough for my use (mainly audio recording). I looked at getting the same G.Skill memory in MyHero, but it became outrageously expensive between the time I build MyHero and now...just like graphics cards!
Speaking of graphics cards, I was originally going to use the Nvidia GTX 1060, but it was full of problems (wake-up from sleep glitzy graphics and graphical lag in High Sierra). While researching for another good graphics card, I read in the MacRumor's Mac Pro forum section that the Sapphire RX 580 Pulse 8GB graphics card was being used in an external GPU case which Apple was selling to developers. It turns out this card works OOB in macOS starting in Sierra 10.12.6. I was fortunate to acquire the Sapphire RX 580 Pulse 8GB graphics card for a "reasonable" price from a seller on eBay in late Fall of 2017. BTW, the Sapphire RX 580 Pulse 8GB card works OOB; no problem with wake-up from sleep and it is recognized correctly in About This Mac.
After following @CaseySJ's work in his Z390/Z490 Golden Builds descritpions, I decided to get a flashed Gigabyte Titan Ridge Thunderbolt 3 PCIe card because my 2017 MBP has Thunderbolt 3, and it would be nice to share some of my audio peripherals and disks. Not wanting to be masochistic (IMO) to flash the card myself, I bought an already flashed Titan Ridge v2 card from an eBay seller. The SSDT to make it work (only Hot Plugable) is attached below. Works like a champ!

Sadly, the Lian Li PC-A05FNB Computer Case is out of production and not even listed on Lian Li's web page. If you can find one used, gobble it up.
Finally, since I use audio interfaces which use a Firewire connection, I am using the SYBA1394B/A Firewire Card which has both Firewire 400 and 800 connectors. Works flawlessly with macOS.
The Installation
Since a build description is more about the build component selection than an installation guide, I'm going to only hit the essentials of the installation which are only peculiar to the HERO. The following assumes you've got all your components installed in the computer system's case.
The following installation procedures are written for High Sierra 10.13.6 using Clover. For those wanting to upgrade/install Success' href='/2020/12/install-macos-mojave-on-supported-pc.html'>Mojave using Clover, see Post #442. Note, however, Nvidia has yet to release drivers for Success' href='/2020/12/install-macos-mojave-on-supported-pc.html'>Mojave for those of you who have a Nvidia graphics card system.
Making the UniBeast USB Installation Thumb Drive
Use the Tonymacx86 guide UniBeast: Install macOS High Sierra on Any Supported Intel-based PC. Note: your USB Thumb drive needs to have 7.63 GB of free space to build the UniBeast installation thumb drive. Otherwise, you'll need a 16GB USB thumb drive which is actually a better size so you can copy the following items to the thumb drive for use in the post installation phase:
 MultiBeast v10.4 for High Sierra which you can probably put on a 8GB USB thumb drive, but a 16GB drive is best KextBeast which might use later to update your kexts in the /Library/Extensions/ folder (/L/E/). Clover Configurator for fine tuning. IORegister v2.1 for fine tuning and checking for USB ports. (Optional) the nVidia Web drivers for the Maxwell chipset cards (750, 750 Ti, 950 Ti, 10x0, etc). See Tonymacx86's sticky thread in the Graphics forum section or the Tonymacx86 driver list. (Optional) If you are using the Sapphire RX 580 Pulse 8GB graphics card, download Lilu, WhateverGreen, and DPCIManager.
BIOS Setup
Follow Step 3 in the Tonymacx86 guide.
Update the BIOS to the latest version which is 2503 as of November 03, 2020. Follow the USB BIOS Flashback method on page 2-12 of the HERO User's Guide. (I use the in-BIOS update utility, but that only works for me with hardwired Ethernet connection.) Once the BIOS is updated, boot into the BIOS, use the Advanced Mode and make the following changes:Extreme Tweeker
AI Overclocker Tuner > X.M.P. Extreme Tweeking > EnableAdvanced Items
System Agent (SA) Configuration > VT-d > Disable (now default) System Agent (SA) Configuration > Graphics Configuration > Primary Display > PEG (for graphics cards) USB Configuration > Legacy USB Support > Enabled (now default) USB Configuration > Keyboard and Mouse Simulation > Disabled (now default) APM Configuration > Power on by PCI - E/PCI > Disabled (now default)
Boot Menu
Fast Boot > Disabled Boot Logo Display > Disabled Secure Boot > OS Type > Other OS (now default) Boot Option 1 > USB installer thumb drive (the UEFI choice if there are two entries) Exit > Save ChangesInstallation Notes
Below is the installation procedures for High Sierra. If you want to install Success' href='/2020/12/install-macos-mojave-on-supported-pc.html'>Mojave, see Post #448. I will update the below in the on coming days.
If you are installing High Sierra over Sierra, do the following before proceeding to the next steps:
Update all your apps so you are current with Sierra.Backup your Sierra installation disk. I use Carbon Copy Cloner.
Follow Steps 4 & 5 in the Tonymacx86 guide: UniBeast: Install macOS High Sierra on Any Supported Intel-based PC. But, Insert the UniBeast created installation USB Thumb Drive in the USB port in the bottom USB port at the bottom of the stack of 4 USB 3 ports (to the left of the stack with the Ethernet port); Boot into the High Sierra Installer with the UniBeast Installer USB thumb drive to begin the installation; (Optional) If you have a current nVidia graphics card, then Boot with nv_disable=1 (Keyboard SpaceBar at the Clover boot screen) until you install the nVidia web drivers; When the installer is through, it will reboot; at the Clover boot screen, double click on the Boot OS X Install from Install macOS High Sierra installation drive. Upon booting into the Desktop, the process will ask you to log into iCloud, do not log in - skip it - as it messes up Messages. Drag & drop MultiBeast, EFI Mounter V3, Clover Configurator and KextBeast files from the thumb drive to your Applications folder, unzip them, run MultiBeast (v10.4+) and selection the following: Quick Start > UEFI Boot Mode Drivers > Audio > AppleALC (Optional) Drivers > Misc > FakeSMC Plugins (Optional) Drivers > Misc > FakeSMC HWMonitor Application Drivers > Misc > Core Graphics Fixup AKA WhateverGreen Drivers > Network > Intel > IntelMausiEthernet (I used the latest version) Drivers > USB > Remove XHCI USB Port Limit <--- Adds PMHeart’s patch to remove XHCI USB Port Limit Drivers > USB > USBInjectAll (Optional) Bootloaders -> Clover v2.4k r4xxx UEFI Boot Mode + Emulated NVRAM <--- Required for use of Nvidia drivers (Optional) Customize -> Graphics Configuration -> NVIDIA Web Drivers Boot Flag <--- Required for use of Nvidia drivers Customize -> Inject ATI <--- For use with RX 580 Customize -> System Definitions > iMac > iMac18,3 Build <--- To see your full configuration Save <--- Save your MultiBeast configuration file somewhere convenient Click on the Install button in the MultiBeast window bottom right hand corner and wait for MultiBeast to finish. Don't reboot yet. For Sapphire RX 580 Pulse graphics card users:Run DCPIManager. If you get this result, skip the rest of these instructions as you have an early, macOS supported Sapphire RX 580 Pulse. If you don't get this result, the proceed, otherwise you are good to go. Add the FBName = Orinoco and Inject > ATI=true & Intel=True to config.plist which you can do with Clover Configurator or Xcode or PlistEditor Pro (which I use):Code:
<key>Graphics</key><dict><key>FBName</key><string>Orinoco</string><dict><key>Inject</key> <key>ATI</key><true/><true/> <key>Intel</key></dict><key>NVidia</key> <false/></dict>
Add Lilu and Whatevergreen kexts to /Library/Extensions/ with KextBeast. Reboot the computer. Reboot into the BIOS. Change BOOT > Boot Options Priorities > Select your installation disk to the UEFI setting for your High Sierra drive.Note: Always pick the UEFI choice if there are two entries for the same drive.
EXIT to save the BIOS update and reboot.To get audio working you'll need to use the Green sound port on the Rear Panel with the System Preference's Sound pane set up as follows:


That's it. Enjoy!

Enjoy your HERO X!
Summary
This Hackintosh is fantastic! Enjoy your Hackintosh. I am really enjoying MyHero II.
What Works
- So far, everything is working as it should including:
- Sleep/Wake-up (starting with 10.13.4).
- USB Charging.
- USB 3.1 and USB 3.1 Type C ports run at USB 3 speeds.
- Ethernet.
- Messages.
- The above MultiBeast procedures also work with the Success' href='/2020/12/install-macos-mojave-on-supported-pc.html'>Mojave Public Beta. To install the Success' href='/2020/12/install-macos-mojave-on-supported-pc.html'>Mojave Beta (on a spare disk!!), see the Tonymacx86 How to Create a macOS Success' href='/2020/12/install-macos-mojave-on-supported-pc.html'>Mojave Public Beta Installation USB Guide.
What Doesn't Work
- The update to 10.13.4 somehow caused the RX 580 DP ports not work. The fix was to keep the default MultiBeast installation iMac 14.2 system definition.
- Lose audio after waking-up from sleep. Fixed by using Luli and AppleLDA which is now an option in MultiBeast v10.4+ (see above). See Post #318 for more information for an already installed configuration.
Not Test Yet
- iMessage
- Continuity and Handoff.
Benchmarks
Soon.
Updates
January 17, 2021. Added a flashed Titan Ridge v2 Thunderbolt 3 PCIe card as described in The Build section. Also updated Success' href='/2020/12/install-macos-mojave-on-supported-pc.html'>Mojave, runing with Clover, to OpenCore and then upgrading to Success' href='/2020/12/install-macos-catalina-on-supported-pc.html'>Catalina. Writeup soon to come.
July 29, 2019. I finally got 'round to it and created SSDT-UIAC for USB port definition and SSDT-USBX.aml for power injection to charge my iPhone and/or iPad. See Post #?.
November 06, 2018. For those wanting to upgrade/install Success' href='/2020/12/install-macos-mojave-on-supported-pc.html'>Mojave, see Post #442.
September 24, 2018. Added the config.plist mod for the Sapphire RX 580 Pulse to use the right frame buffer. See also Post #342. Updated the MultiBeast v10.4.0 configuration choices and the Build window.
September 07, 2018. Updated the statement on processor power management working natively. Thanks @morganb.
August 18, 2018. Update the Installation/MultiBeast procedures to reflect MultiBeast v10.4+.
August 17, 2018. Corrected the PMHeart/FredWst USB patch in config.plist code. Thanks to @photomattmills for catching this change. Reference: https://www.Tonymacx86/threads/macos-10-13-6-update.255911/page-2#post-1775606
August 12, 2018. Change the way audio is done to fix the no audio after sleep/wake-up. See Post #318 if you've already installed High Sierra or Success' href='/2020/12/install-macos-mojave-on-supported-pc.html'>Mojave.
July 24, 2018. Updated to High Sierra 10.13.6 from 10.13.5. See Post #295 for update procedures.
June 28, 2018. Updated the post MultiBeast installation with the apfs.efi boot patch to get rid of verbose information before the Clover Boot Screen.
June 2, 2018. Updated to High Sierra 10.13.5 from 10.13.4. See Post #131 for procedures.
May 16, 2018. Updated the MultiBeast configuration audio choices for the first MultBeast run. See toleda's thread here.
May 10, 2018. Finished updating the installation procedures for 10.13.4. Thanks to Ghee_Whiz for inadvertently reminding me of this task. Additionally, I discovered that the 10.13.4 Supplemental Update "broke" the use of my RX 580's DP ports using the iMac18,3. Changing the System Definition to iMac14,2.
April 25, 2018. Added the BIOS setting Advanced>System Agent(SA)>Graphics Configuration>Primary Display>PEG per majixspell's recommendation (Post #77).
April 15, 2018. Updated from 10.13.3 to 10.13.4. See Post #57 from my update procedures.
February 13, 2018. High Sierra 10.13.3 broke wake-up from sleep which requires a reboot.
February 5, 2018. Editing and minor updates.
January 30, 2018. This initial write-up.
Attachments


Post a Comment